今日は、お待ちかねの WebSocket ネタです。
ご存知ない方のために説明しますと、複数のクライアントとサーバ間でリアルタイムに情報が同期される仕組みを Web で実現するプロトコルです。 わくわくしますね。
Node.js と React の再学習。
— たーせる (@tercel_s) September 8, 2017
React + Express + Socket.IO で「リアルタイム『いいね』ボタン」を作って、AWS Elastic Beanstalk 環境にデプロイしてみた。 pic.twitter.com/GiYci2Glb9
この夢のような仕組みに API Gateway が対応したのが 2018年末のこと*1。
しかし、内容が内容なだけに、どれだけミニマルな構成で構築したとしても如何せんコーディングの分量が多く、難度もそれなりに高い題材ではありました。
そこで今回、WebSocket を取り上げるにあたり、無理に1記事にまとめることはせず、複数の記事に分ける代わりに、できるだけステップバイステップで丁寧に解説を入れることにしました。 今日ははじめの一歩『接続篇』と題して、WebSocket の入り口部分を作っていこうと思います。
■ 今日のメニュー
準備運動
題材設定と、本日作るもの
今回のテーマはかなり長丁場になりますので、動機付けのため先にゴールを示しておきましょう。
本テーマの最終ゴール
この連載の中で、超シンプルなチャットアプリを完成させます。 これは、公式サンプルの『simple-websockets-chat-app』をベースにしています*2。
本日作るもの
WebSocket で何をするにせよ、2つの Lambda が必要です。
- 接続: コネクションが確立したら、そのクライアントを DynamoDB に格納する
- 切断: コネクションが切れたら、そのクライアントを DynamoDB から削除する
これらは、WebSocket で何をするにしても、必ず作る必要があります。
今日はこれらのうち、接続時の Lambda だけを徹底的に作り込んでいきます。
Lambda 関数はステートレスな仕組みですので、メモリやローカルファイルではなく、データを確実に永続化できるデータベースを使ってコネクション管理を行うのです。
プロジェクトの作成
例によって、AWS SAM (Serverless Application Model) で構成管理します。
sam init コマンドを使って、Hello World テンプレートから適当な名前の SAM プロジェクトを作りましょう。 次のようにオプションを指定すると、コマンド一発でプロジェクトを新規作成できます。
$sam init \
  --name sam-websocket \
  --runtime python3.9 \
  --app-template hello-world \
  --package-type Zip

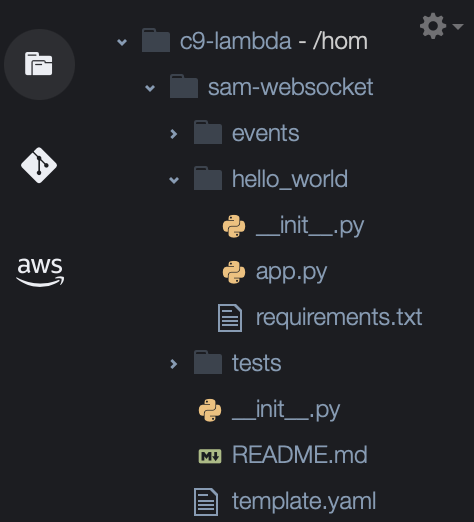
このコマンドを実行直後、以下のようなフォルダ構成になっているはずです。 これが本日の出発地点です。
SAM テンプレート篇
Lambda リソースの修正
初めに、もともとある Lambda のリソースを使って、コネクション確立時に実行される Lambda 関数 OnConnectFunction を仕立てていきます。
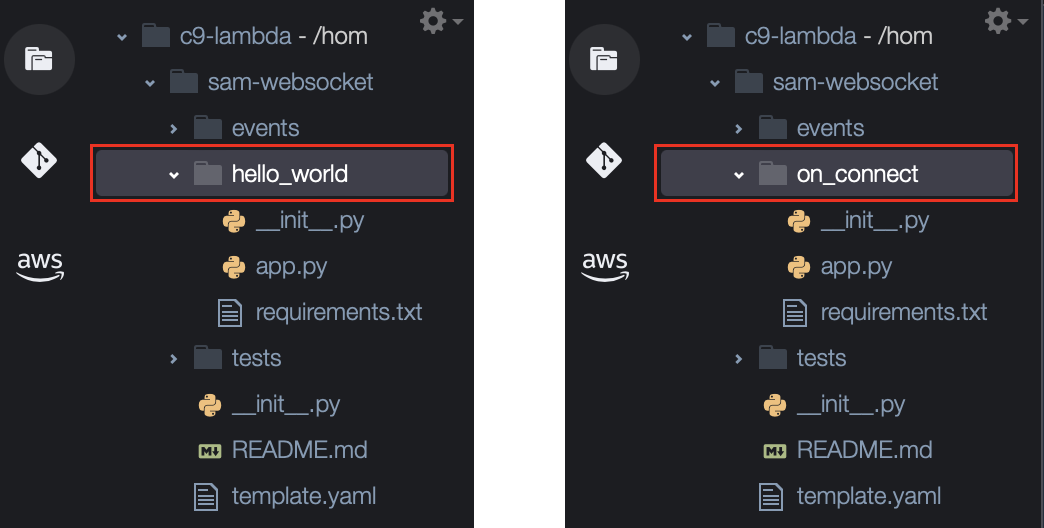
これから、複数の Lambda を作成していく都合上、今のうちにhello_worldディレクトリを分かりやすくリネームしておきましょう。
また、template.yaml からも不要な設定はバッサリ削除してしまいます。
  Resources:
+   # 接続 - Lambda
-   HelloWorldFunction:
+   OnConnectFunction:
      Type: AWS::Serverless::Function
      Properties:
-       CodeUri: hello_world
+       CodeUri: on_connect
        Handler: app.lambda_handler
        Runtime: python3.9
-       Architectures:
-         - x86_64
-       Events:
-         HelloWorld:
-           Type: Api
-           Properties:
-             Path: /hello
-             Method: get
Outputs セクションも、生かしておく必要がないので一旦すべて削除しておきましょう。
整理した後の template.yaml は以下の通りです。 だいぶスッキリしました。
AWSTemplateFormatVersion: '2010-09-09'
Transform: AWS::Serverless-2016-10-31
Description: ""

Globals:
  Function:
    Timeout: 3

Resources:
  # 接続 - Lambda
  OnConnectFunction:
    Type: AWS::Serverless::Function
    Properties:
      CodeUri: on_connect
      Handler: app.lambda_handler
      Runtime: python3.9
関数の中身を作り込みたいところですが、ひとまずそこは措いて、template.yaml を編集していくことにします。
API Gateway の追加
HTTP 通信用の API エンドポイントを作るケースでは AWS SAM 用に簡略化された AWS::Serverless::Api や AWS::Serverless::HttpApi を利用することができましたが、WebSocket の場合はそのような簡便なものがありません。
そのため、CloudFormation の生のリソース AWS::ApiGatewayV2::Api から作っていくことになります。
ご覧のとおり、ProtocolType には WEBSOCKET を指定しましょう。
  Resources:
+   # API Gateway
+   SimpleChatWebSocket:
+     Type: AWS::ApiGatewayV2::Api
+     Properties:
+       Name: SimpleChatWebSocket
+       ProtocolType: WEBSOCKET
+       RouteSelectionExpression: "$request.body.message"

    # 接続 - Lambda
    OnConnectFunction:
      Type: AWS::Serverless::Function
      Properties:
        CodeUri: on_connect
        Handler: app.lambda_handler
        Runtime: python3.9
さて、RouteSelectionExpressionという見慣れない属性があります。
これはルート選択式と呼ばれるものです。 本日取り扱う範囲を逸脱するため詳細な解説は避けますが、これを設定しないと このあとsam deployできないため、ちょっと気持ち悪いですがおまじないとして設定しています(後日改めて解説します)。
ステージの追加
ステージは、これまで(第7話まで)暗黙的に作られていたリソースですが、今回に関しては明示的に作成しなくてはなりません。 こうして作成したステージは、すぐ後に説明するように API エンドポイント URL の一部になります。
  Resources:
    # API Gateway
    SimpleChatWebSocket:
      Type: AWS::ApiGatewayV2::Api
      Properties:
        Name: SimpleChatWebSocket
        ProtocolType: WEBSOCKET
        RouteSelectionExpression: "$request.body.message"

    # 接続 - Lambda
    OnConnectFunction:
      Type: AWS::Serverless::Function
      Properties:
        CodeUri: on_connect
        Handler: app.lambda_handler
        Runtime: python3.9

+   # Prod ステージ
+   Stage:
+     Type: AWS::ApiGatewayV2::Stage
+     Properties:
+       StageName: Prod
+       ApiId: !Ref SimpleChatWebSocket
+       AutoDeploy: true
Outputs セクションの追加
ここまでの手順で WebSocket の API エンドポイントができたので、それを出力するように SAM テンプレートを修正しましょう。
  Resources:
    # API Gateway
    SimpleChatWebSocket:
      Type: AWS::ApiGatewayV2::Api
      Properties:
        Name: SimpleChatWebSocket
        ProtocolType: WEBSOCKET
        RouteSelectionExpression: "$request.body.message"

    # 接続 - Lambda
    OnConnectFunction:
      Type: AWS::Serverless::Function
      Properties:
        CodeUri: on_connect
        Handler: app.lambda_handler
        Runtime: python3.9

    # Prod ステージ
    Stage:
      Type: AWS::ApiGatewayV2::Stage
      Properties:
        StageName: Prod
        ApiId: !Ref SimpleChatWebSocket
        AutoDeploy: true

+ Outputs:
+   WebSocketURI:
+     Description: "The WSS Protocol URI to connect to"
+     Value: !Sub "wss://${SimpleChatWebSocket}.execute-api.${AWS::Region}.amazonaws.com/${Stage}"
URL の形式は、公式情報『API ゲートウェイでの WebSocket API のデプロイ - Amazon API Gateway』に、以下のように記されていますので、それに遵います。
wss://{api-id}.execute-api.{region}.amazonaws.com/{stageName}
$connect ルートの作成
少々天下り的ですが、公式ドキュメント『WebSocket API のルートの操作 - Amazon API Gateway』によると、WebSocket の場合、ルートと呼ばれる設定に基づいて、リクエストをバックエンドの Lambda に振り分けるようになっているそうです。
── ということで、まずは接続開始時の振り分け設定を行うため、$connect ルートのリソースを作ります。
  Resources:
    # API Gateway
    SimpleChatWebSocket:
      Type: AWS::ApiGatewayV2::Api
      Properties:
        Name: SimpleChatWebSocket
        ProtocolType: WEBSOCKET
        RouteSelectionExpression: "$request.body.message"

+   # 接続 - ルート
+   ConnectRoute:
+     Type: AWS::ApiGatewayV2::Route
+     Properties:
+       ApiId: !Ref SimpleChatWebSocket
+       RouteKey: $connect

    # 接続 - Lambda
    OnConnectFunction:
      Type: AWS::Serverless::Function
      Properties:
        CodeUri: on_connect
        Handler: app.lambda_handler
        Runtime: python3.9

    # Prod ステージ
    Stage:
      Type: AWS::ApiGatewayV2::Stage
      Properties:
        StageName: Prod
        ApiId: !Ref SimpleChatWebSocket
        AutoDeploy: true

  Outputs:
    WebSocketURI:
      Description: "The WSS Protocol URI to connect to"
      Value: !Sub "wss://${SimpleChatWebSocket}.execute-api.${AWS::Region}.amazonaws.com/${Stage}"
接続確認と Ping/Pong
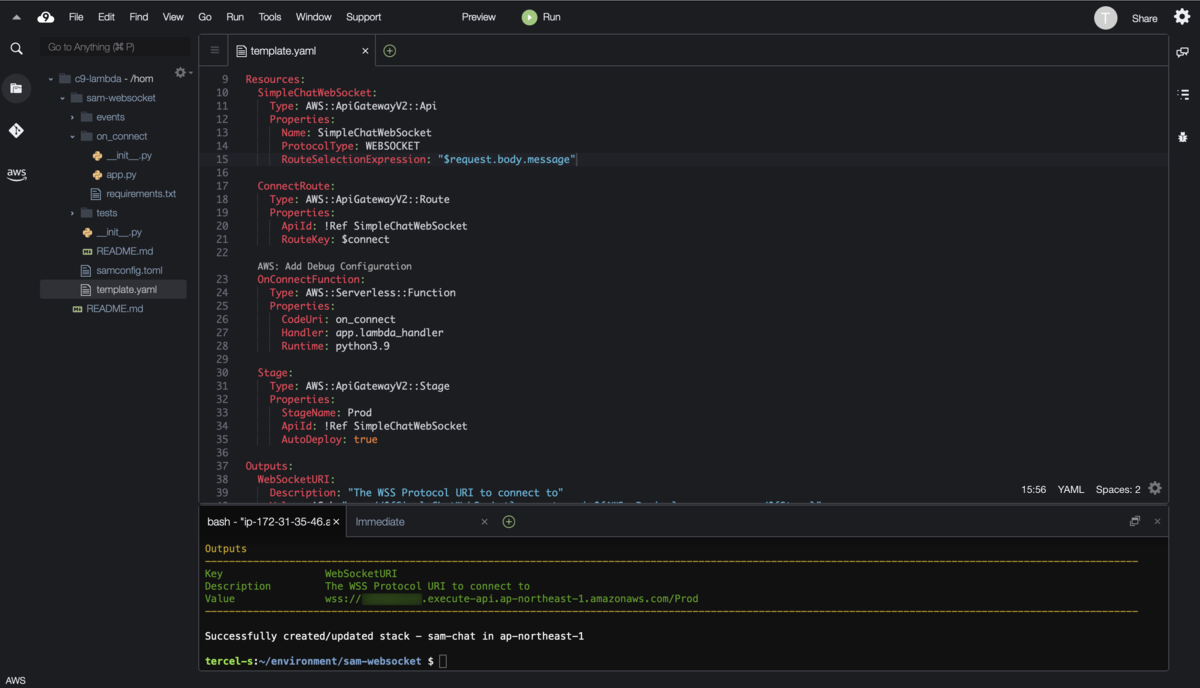
ここまでできたら、一旦 sam build、sam deployしてみましょう。
今の時点では、まだ API を叩いても Lambda は実行されません。
ただ、$connectルートを設定したことで WebSocket のコネクションが確立できるようにはなっているので、動きを確認しておきましょう。
WebSocket の接続確認には、wscat というツールを利用します。
npm (Node Package Manager) を利用して、wscat を Cloud9 にインストールしましょう(Cloud9には、npmがデフォルトで導入済みなので、以下のコマンドをそのまま実行できます)。
$npm i -g wscat
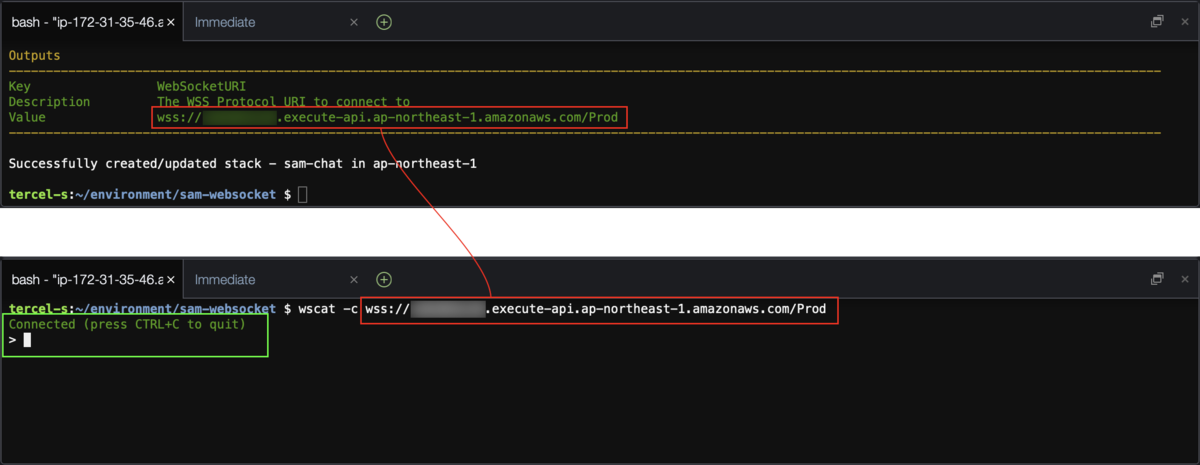
この wscat を使って、API エンドポイントに接続確認してみましょう。 以下のコマンドを入力して、Connected (press CTRL+C to quit) と表示されれば成功です。
$wscat -c wss://████.execute-api.ap-northeast-1.amazonaws.com/Prod
Connected (press CTRL+C to quit)
Ctrl+C で接続を切ることができます。
さて、MDN の解説『WebSocket サーバーの記述 - Web API | MDN』によると、WebSocket 接続中は、Ping / Pong のメッセージ交換が行えると記されています。
Ping と Pong: WebSockets のハートビートハンドシェイク後の任意の時点で、クライアントまたはサーバのどちらかが、相手にpingを送信することを選択できます。 pingが受信されると、受信者はできるだけ早くpongを返さなければなりません。 これを使用して、たとえばクライアントがまだ接続されていることを確認できます。
これを試してみましょう。
$wscat -c wss://████.execute-api.ap-northeast-1.amazonaws.com/Prod --slash -P
Connected (press CTRL+C to quit)
> /ping
< Received pong
クライアントから Ping を送ると、サーバから Pong が返ってくることが確認できました。

API Gateway と Lambda の紐付け
ただし、現時点ではまだ$connectルート が呼ばれたときに肝心の Lambda が動いてくれません。
API Gateway と Lambda の紐付けが必要になります。
が、ここで一つ問題があります。
これまで、REST API や HTTP API を契機に Lambda を起動する設定を行なってきた際は、AWS::Serverless::Function の Event 属性にイベントソースを直接設定していましたが、WebSocket の場合は残念ながらそのようなお手軽設定ができません。
そこで、(WebSocket型の)API Gateway と Lambda を紐づける 統合 リソースを新たに定義して、ルートからそれを参照する形を取ります。
  Resources:
    # API Gateway
    SimpleChatWebSocket:
      Type: AWS::ApiGatewayV2::Api
      Properties:
        Name: SimpleChatWebSocket
        ProtocolType: WEBSOCKET
        RouteSelectionExpression: "$request.body.message"

    # 接続 - ルート
    ConnectRoute:
      Type: AWS::ApiGatewayV2::Route
      Properties:
        ApiId: !Ref SimpleChatWebSocket
        RouteKey: $connect
+       Target: !Join
+         - '/'
+         - - 'integrations'
+           - !Ref ConnectInteg

+   # 接続 - 統合リソース
+   ConnectInteg:
+     Type: AWS::ApiGatewayV2::Integration
+     DependsOn:
+       - OnConnectFunction
+     Properties:
+       ApiId: !Ref SimpleChatWebSocket
+       IntegrationType: AWS_PROXY
+       IntegrationUri: !Sub arn:aws:apigateway:${AWS::Region}:lambda:path/2015-03-31/functions/${OnConnectFunction.Arn}/invocations

    # 接続 - Lambda
    OnConnectFunction:
      Type: AWS::Serverless::Function
      Properties:
        CodeUri: on_connect
        Handler: app.lambda_handler
        Runtime: python3.9

    # Prod ステージ
    Stage:
      Type: AWS::ApiGatewayV2::Stage
      Properties:
        StageName: Prod
        ApiId: !Ref SimpleChatWebSocket
        AutoDeploy: true

  Outputs:
    WebSocketURI:
      Description: "The WSS Protocol URI to connect to"
      Value: !Sub "wss://${SimpleChatWebSocket}.execute-api.${AWS::Region}.amazonaws.com/${Stage}"
上記の IntegrationType 属性の AWS_PROXY とは、Lambda プロキシ統合と呼ばれる方式です。 ざっくり言うと、API Gateway がクライアントから受け取った要求電文を、そのまま(加工せず) Lambda 関数に引き渡すことを意味します。
また、 IntegrationUri属性は、紐付け先の Lambda 関数を一意に特定する文字列です。 Lambda のリソース ARN だけでなく、固定文字列なども混ざっており、非常にわずらわしい形式をしています。
これは『API 統合リクエストの基本タスク - Amazon API Gateway』に、以下の決まり事として記述があります。
Lambda または Lambda プロキシ統合を設定するときは、Lambda 関数を呼び出すための Amazon リソースネーム (ARN) を統合リクエスト URI 値として割り当てます。この ARN は以下の形式になります。arn:aws:apigateway:api-region:lambda:path//2015-03-31/functions/arn:aws:lambda:lambda-region:account-id:function:lambda-function-name/invocations
この長い URI 全体のうち、arn:aws:lambda:lambda-region:account-id:function:lambda-function-nameは、Lambda 関数のリソース ARN 形式そのものですから*3、結局、IntegrationUriは以下のようになります。
IntegrationUri: !Sub arn:aws:apigateway:${AWS::Region}:lambda:path/2015-03-31/functions/${OnConnectFunction.Arn}/invocations
ただし注意点として、SAM テンプレートのリソースは、基本的に順不同で作成されます(ただし !Ref や !Sub で他のリソースを参照している場合は、参照しているリソースから先に作成されます)。
そのため、OnConnectFunction リソースの作成が完了する前に ConnectInteg が作られようとすると、OnConnectFunction.Arn が参照できずエラーとなってしまいます。
このようなことが起こらないよう、必ずConnectIntegよりも先にOnConnectFunction が作成されることを保証するためにDependsOn 属性を設定しています。
Lambda の起動権限の付与
── 現時点で、まだ不足しているものがあります。
API Gateway が $connected ルートから Lambda を実行しようとすると、権限が足りなくて Lambda の起動に失敗し、エラーが返ってしまうのです。
そこで、パーミッション リソースを新たに定義して、API Gateway から Lambda が起動できるよう権限を付与してあげましょう。
  Resources:
    # API Gateway
    SimpleChatWebSocket:
      Type: AWS::ApiGatewayV2::Api
      Properties:
        Name: SimpleChatWebSocket
        ProtocolType: WEBSOCKET
        RouteSelectionExpression: "$request.body.message"

    # 接続 - ルート
    ConnectRoute:
      Type: AWS::ApiGatewayV2::Route
      Properties:
        ApiId: !Ref SimpleChatWebSocket
        RouteKey: $connect
        Target: !Join
          - '/'
          - - 'integrations'
            - !Ref ConnectInteg

    # 接続 - 統合リソース
    ConnectInteg:
      Type: AWS::ApiGatewayV2::Integration
      DependsOn:
        - OnConnectFunction
      Properties:
        ApiId: !Ref SimpleChatWebSocket
        IntegrationType: AWS_PROXY
        IntegrationUri: !Sub arn:aws:apigateway:${AWS::Region}:lambda:path/2015-03-31/functions/${OnConnectFunction.Arn}/invocations

+   # 接続 - パーミッション
+   OnConnectPermission:
+     Type: AWS::Lambda::Permission
+     DependsOn:
+       - SimpleChatWebSocket
+       - OnConnectFunction
+     Properties:
+       Action: lambda:InvokeFunction
+       FunctionName: !Ref OnConnectFunction
+       Principal: apigateway.amazonaws.com

    # 接続 - Lambda
    OnConnectFunction:
      Type: AWS::Serverless::Function
      Properties:
        CodeUri: on_connect
        Handler: app.lambda_handler
        Runtime: python3.9

    # Prod ステージ
    Stage:
      Type: AWS::ApiGatewayV2::Stage
      Properties:
        StageName: Prod
        ApiId: !Ref SimpleChatWebSocket
        AutoDeploy: true

  Outputs:
    WebSocketURI:
      Description: "The WSS Protocol URI to connect to"
      Value: !Sub "wss://${SimpleChatWebSocket}.execute-api.${AWS::Region}.amazonaws.com/${Stage}"
Lambda の起動確認
ようやく、Lambda が起動できるようになりました。
wscat で WebSocket 接続し、CloudWatch Logs から Lambda の起動を確認しましょう。

Lambda 関数篇
コネクションIDの取得
ここからは、Lambda 関数の中身を実装していきます。
■ 本日作る Lambda接続: コネクションが確立したら、そのクライアントを DynamoDB に格納する
これを実装するには、event パラメータのどこかに格納されている、クライアントを一意に識別するためのIDを探し出して取得する必要があります。
まずは event パラメータがどのような形式で、具体的に何が引き渡されてくるのかを直接確認しましょう。
import json

def lambda_handler(event, context):
    print(event)

    return {}
この Lambda を実行して CloudWatch Logs で確認すると、event パラメータの形式が分かります。
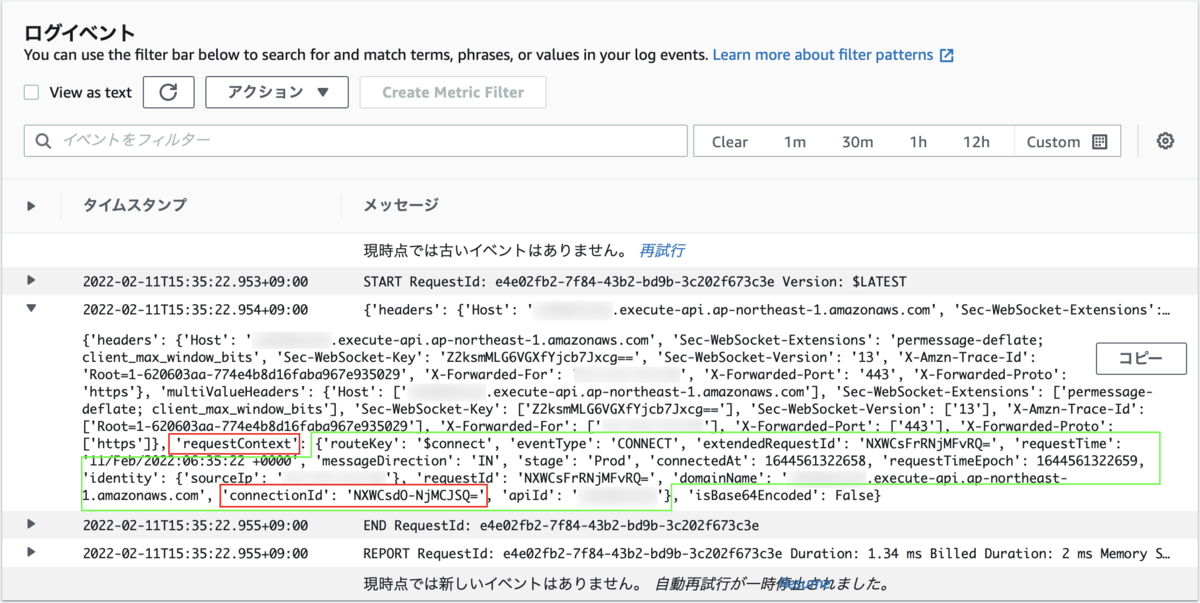
ここで欲しいのが connectionId の値で、WebSocket ではこの ID を使って接続中のクライアントを識別します。
先ほどの実験でeventの形式が判ったので、そのデータの階層を辿ってconnectionIdを以下のように取得できます。
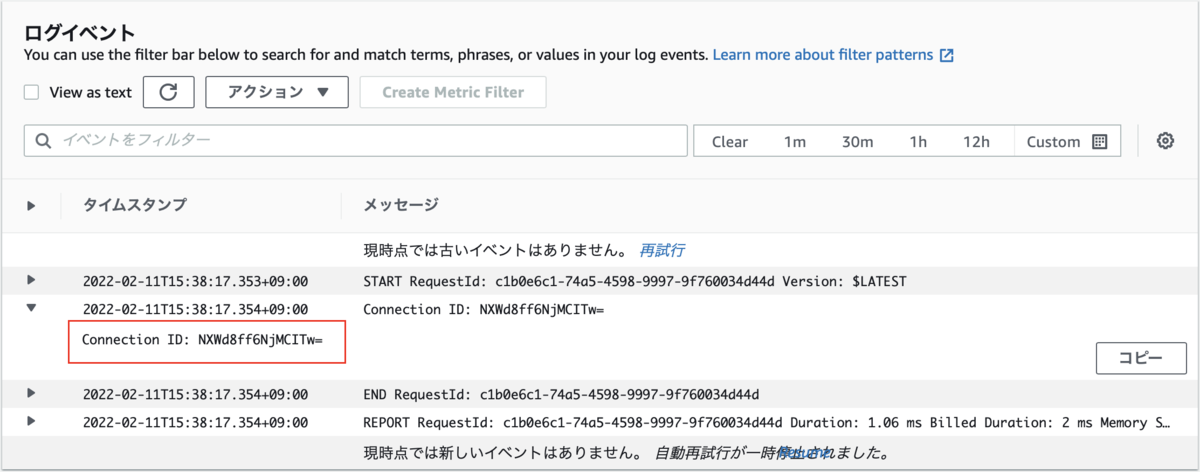
import json

def lambda_handler(event, context):
    connection_id = event['requestContext']['connectionId']
    print(f'Connection ID: {connection_id}')

    return {}
CloudWatch Logs から、コネクションID が取得できていることが確認できます。
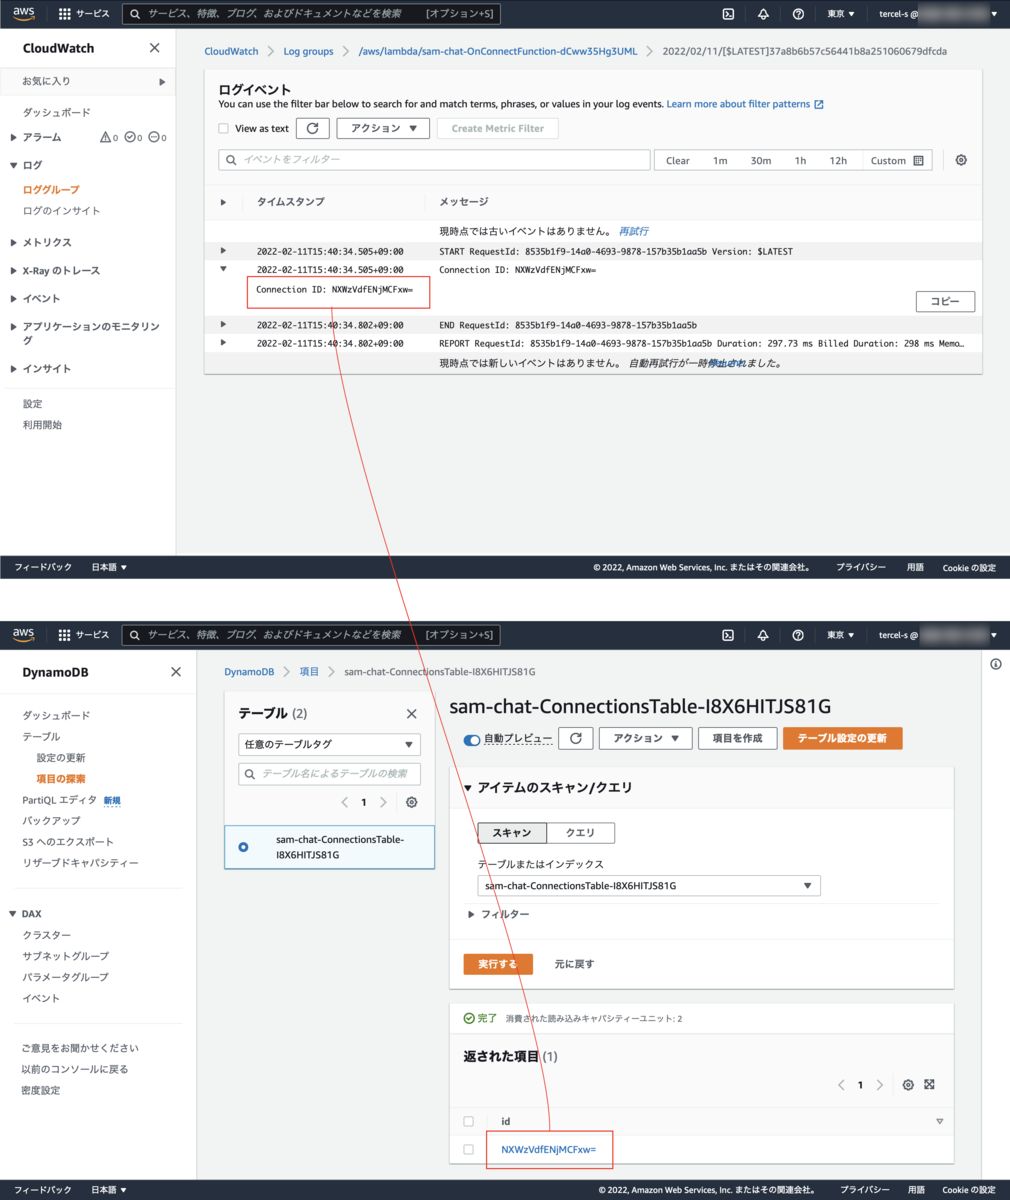
DynamoDB への登録
適当な DynamoDB テーブルを一つ作り、そこに コネクションID を登録する Lambda を実装したら今日はおしまいです。
ここまでくれば、あとは履修済みの内容ばかりです。
Connection テーブルの作成
template.yaml に、DynamoDB テーブル(AWS::Serverless::SimpleTable)を一つ追加します。 コネクションIDを格納するテーブルなので、名前はConnectionsTableとでもしておきましょう。
  Resources:
    # API Gateway
    SimpleChatWebSocket:
      Type: AWS::ApiGatewayV2::Api
      Properties:
        Name: SimpleChatWebSocket
        ProtocolType: WEBSOCKET
        RouteSelectionExpression: "$request.body.message"

    # 接続 - ルート
    ConnectRoute:
      Type: AWS::ApiGatewayV2::Route
      Properties:
        ApiId: !Ref SimpleChatWebSocket
        RouteKey: $connect
        Target: !Join
          - '/'
          - - 'integrations'
            - !Ref ConnectInteg

    # 接続 - 統合リソース
    ConnectInteg:
      Type: AWS::ApiGatewayV2::Integration
      DependsOn:
        - OnConnectFunction
      Properties:
        ApiId: !Ref SimpleChatWebSocket
        IntegrationType: AWS_PROXY
        IntegrationUri: !Sub arn:aws:apigateway:${AWS::Region}:lambda:path/2015-03-31/functions/${OnConnectFunction.Arn}/invocations

    # 接続 - パーミッション
    OnConnectPermission:
      Type: AWS::Lambda::Permission
      DependsOn:
        - SimpleChatWebSocket
        - OnConnectFunction
      Properties:
        Action: lambda:InvokeFunction
        FunctionName: !Ref OnConnectFunction
        Principal: apigateway.amazonaws.com

    # 接続 - Lambda
    OnConnectFunction:
      Type: AWS::Serverless::Function
      Properties:
        CodeUri: on_connect
        Handler: app.lambda_handler
        Runtime: python3.9

    # Prod ステージ
    Stage:
      Type: AWS::ApiGatewayV2::Stage
      Properties:
        StageName: Prod
        ApiId: !Ref SimpleChatWebSocket
        AutoDeploy: true

+   # コネクションID テーブル
+   ConnectionsTable:
+     Type: AWS::Serverless::SimpleTable
テーブルへの書き込み権限の追加
Lambda 関数からテーブルを読み書きできるよう、書き込み権限(DynamoDBWritePolicy)を与えます。
    # 接続 - Lambda
    OnConnectFunction:
      Type: AWS::Serverless::Function
      Properties:
        CodeUri: on_connect
        Handler: app.lambda_handler
        Runtime: python3.9
+       Policies:
+         - DynamoDBWritePolicy:
+             TableName: !Ref ConnectionsTable
環境変数の追加
先ほど作成した DynamoDB テーブル名を、Lambda 関数から参照できるよう、環境変数を追加します。
以下は、CONNECTIONS_TABLEという環境変数を経由して、テーブル名を取得できるようにしています。
    # 接続 - Lambda
    OnConnectFunction:
      Type: AWS::Serverless::Function
      Properties:
        CodeUri: on_connect
        Handler: app.lambda_handler
        Runtime: python3.9
        Policies:
          - DynamoDBWritePolicy:
              TableName: !Ref ConnectionsTable
+       Environment:
+         Variables:
+           CONNECTIONS_TABLE: !Ref ConnectionsTable
Lambda の実装: テーブルへのコネクションIDの登録
最後に、Lambda 側の実装を仕上げましょう。
eventパラメータから取得したconnectionId を、そのまま DynamoDB テーブルに登録します。
import boto3
import json
import os

dynamodb = boto3.resource('dynamodb')

def lambda_handler(event, context):
    # コネクションIDを取得
    connection_id = event['requestContext']['connectionId']
    print(f'Connection ID: {connection_id}')

    # テーブルを取得
    table_name = os.environ['CONNECTIONS_TABLE']
    connections_table = dynamodb.Table(table_name)

    # テーブルにコネクションIDを新規登録
    connections_table.put_item(Item = {'id': connection_id})

    return {}
動作確認
いよいよ本日最後の動作確認です。
再度 Lambda を実行して、CloudWatch Logs に出力されているコネクションID と同じものが、DynamoDB テーブルに追加されていれば成功です。
本日の演習は以上です。 お疲れ様でした。
本日のまとめ
- WebSocket に対応した API Gateway と Lambda を、AWS SAM で構築した
- WebSocket 接続時に、コネクションIDを DynamoDB に登録する関数を実装した
- 接続時には
$connectルート、切断時には$disconnectルートがそれぞれ必要- 今回は
$connectルートのみ構築した
- 今回は
ただし、現時点では切断時の処理が実装されておらず、DynamoDB にコネクションID が溜まりっぱなしになっています。
そこで次回は、コネクション切断時の振る舞いに必要な AWS リソースや Lambda 関数を作り込んでいければと思います。
なっっっが……!!
長いね。
これで、全工程のうち、どのくらいなの?
まぁ、1/3 くらいですかね。
Node.js ならもっと少ない手数で WebSocket を実装できるのですが。
えぇ……。
AWSTemplateFormatVersion: '2010-09-09'
Transform: AWS::Serverless-2016-10-31
Description: ""

Globals:
  Function:
    Timeout: 3

Resources:
  SimpleChatWebSocket:
    Type: AWS::ApiGatewayV2::Api
    Properties:
      Name: SimpleChatWebSocket
      ProtocolType: WEBSOCKET
      RouteSelectionExpression: "$request.body.message"

  ConnectRoute:
    Type: AWS::ApiGatewayV2::Route
    Properties:
      ApiId: !Ref SimpleChatWebSocket
      RouteKey: $connect
      Target: !Join
        - '/'
        - - 'integrations'
          - !Ref ConnectInteg

  ConnectInteg:
    Type: AWS::ApiGatewayV2::Integration
    DependsOn:
      - OnConnectFunction
    Properties:
      ApiId: !Ref SimpleChatWebSocket
      IntegrationType: AWS_PROXY
      IntegrationUri: !Sub arn:aws:apigateway:${AWS::Region}:lambda:path/2015-03-31/functions/${OnConnectFunction.Arn}/invocations

  OnConnectPermission:
    Type: AWS::Lambda::Permission
    DependsOn:
      - SimpleChatWebSocket
      - OnConnectFunction
    Properties:
      Action: lambda:InvokeFunction
      FunctionName: !Ref OnConnectFunction
      Principal: apigateway.amazonaws.com

  OnConnectFunction:
    Type: AWS::Serverless::Function
    Properties:
      CodeUri: on_connect
      Handler: app.lambda_handler
      Runtime: python3.9
      Policies:
        - DynamoDBWritePolicy:
            TableName: !Ref ConnectionsTable
      Environment:
        Variables:
          CONNECTIONS_TABLE: !Ref ConnectionsTable

  ConnectionsTable:
    Type: AWS::Serverless::SimpleTable

  Stage:
    Type: AWS::ApiGatewayV2::Stage
    Properties:
      StageName: Prod
      ApiId: !Ref SimpleChatWebSocket
      AutoDeploy: true

Outputs:
  WebSocketURI:
    Description: "The WSS Protocol URI to connect to"
    Value: !Sub "wss://${SimpleChatWebSocket}.execute-api.${AWS::Region}.amazonaws.com/${Stage}"
*1:[発表]Amazon API GatewayでWebsocketが利用可能 | Amazon Web Services ブログ
*2:ただし、SAM テンプレートや Lambda の簡略化を図っています。